Not all of my ideas are winners

I have this set of Russian Kettle bells I love to work out with.  I also gave one to my mom for Christmas.  When you are buying them there are the regular ones and the fancy rubber-dipped ones.  The heavy ones only come in the regular type because I guess people buying big heavy blobs of iron just want the cheapest one.

IMG_4415.JPG
The pink one is not mine. Promise.

I store these in the laundry room with tile floor. I always worry that I’m going to set the 40 pounder down too hard and do some damage.  I’ve been looking to do a similar dip job that the others came with, but I can’t find anyone that sells a “bucket of rubber” – it’s possible I don’t know what I’m looking for.

IMG_4410.JPG
Good Kettle Bell covering?

I came across this product Plasti Dip and they show a wrench with a rubber grip so I thought I found a solution.  I couldn’t find the canned version at Home Depot or Lowes, and it appears to only come in small 7 and 14 ounce cans and I reckon I’d need about a gallon to dip the kettle bell. They did have the spray on version which I guessed was equivalent.  I masked off the kettle bell with some duct tape and grocery bags and sprayed on 6 layers over the course of a few days.  Here it is in progress:


IMG_4411.JPG
Classy masking job done with duct tape.

My results suggest that this is not the ideal application for Plasti Dip.  It doesn’t  take to masking since the layers form a plastic film.  I can’t blame them for that, it’s exactly what the product promises.

IMG_4412.JPG
Masking removed, 6 layers of dip sprayed on. Notice wrinkled edges from attempted mask job.

It also did not adhere to the smooth enamel paint on the kettle bell.  I’m sure the rubber on the smaller bells only stays on because it goes all the way around the body, but it would have taken a couple of cans of plasti dip to cover this up but there was another reason it wasn’t suitable for me.

IMG_4414.JPG
Plasti Dip peeled right off the polished kettle bell.

It’s also not called “Rubber Dip” for a very important reason.  The resulting surface was almost as hard as the metal it was covering.  It’s not as rubbery as I expected, maybe the canned version is different.  I’m not reviewing Plasti Dip here, it’s good for a lot of stuff, but it’s not the rubber coat I needed for the kettle bell.

Does any one know where I can get a giant quantity of rubber? What type of rubber I need?  Would be interested to hear it in the comments.


Steven Gangstead
 

Xmas Electricity

Remember that “professional” does not mean “craftsman.”  The definition of professional that’s always stuck with me is litmus test of “did he get paid to do it.”

For example, no one is paying me to fix my car, or else I would do a better job than bending stuff back into shape with pliers.  I guess my solution was kind of crafty, but a real pro would buy a new switch and charge you for it.  It minimizes his time at your expense.

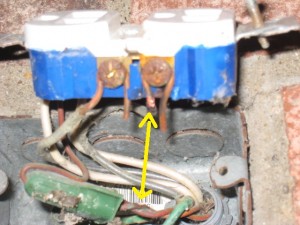
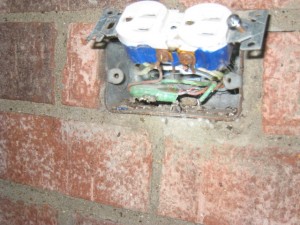
I was stringing up some Christmas lights and when I went to plug in the timer there was a pop and the circuit tripped.  After verifying the power was indeed off at the breaker I took out the outlet and saw this:

Food truck is here, I'll just jam all these wires in and be on my way. Click to enlarge

Explanation: those screws that pinch into the wire are energized.  When you touch the hot wire to the ground wire it trips the GFCI.  In general you don’t want that screw touching anything and you don’t want a strip off a foot of wire when 3/4″ is all you need to wrap around the screw or you get a lot of extra lightning rods sticking out of it like this:

Matching char marks on hot and ground

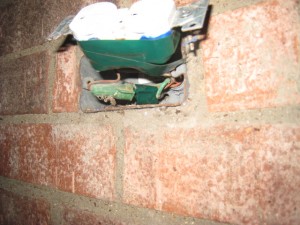
The reason why there are two black wires is one comes from the panel or outlet closer to the panel and the other goes to the next outlet.  Neutral/white is on the other side and never the two shall meet.  I trimmed up the excess wire a little bit, but there was still too much wire in general and the outlet was really flimsy (one of the screws to hold it in was a freaking drywall screw) so I mummified the whole thing in electrical tape:

It was 30 degrees out when I took this, no time to center the picture.

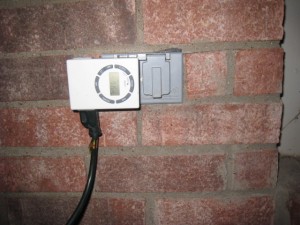
I was careful tucking the wires back in so nothing would touch and now I have Christmas from 5-10pm every night:

A picture of the Christmas lights this powers would have been more interesting

So remember, just because a professional electrician wired it doesn’t mean it was done right, or that he gave a damn.  If I had to wire outlets all day I would probably be pretty sloppy too, as it is I just have to fix one and fix the crap out of it.  My FiOS is on that circuit, if it trips I don’t have internet and the house suddenly gets very small and boring.

Time:

1 hr in the cold, so felt like 2

Money:

Spent – $.02 in electrical tape
Saved – I have no idea what an electrician cost, and without internet I wouldn’t be able to find out.

Steven Gangstead

Sixty Dollar Bait and Switch

Last week I did a fix on my Tacoma that saved me $60. My old trusty Taco has been getting a little less trusty lately.  It’s starting to get a little long in the tooth (it’s a 1999 model, I’ve had since 2001).

My Tacoma on the left, enormous compensation to the right
Problem:

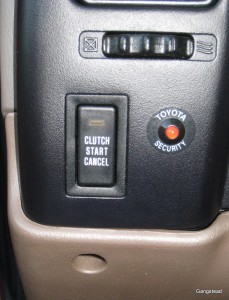
It’s a manual model and last week it stopped starting in the middle of a road trip.  In a manual you have to have the clutch depressed all the way for the engine to turn over unless you press the “Clutch Start Cancel” button.

More useful button: passenger ejection seat

This button allows you to start the car without the clutch pressed back all the way.  I’ve never found a real use for this button, who would want their car to lurch forward when they started it?  I’ve read online some people do it when they want to warm up their car in the winter, but sitting in it long enough to start it wouldn’t bother me.  Then again I live in Texas so in the winter it doesn’t take a car to warm up from 40 degrees.

I used the clutch start cancel button until the weekend when I could take a look at it.  Since the truck was otherwise running fine I figured it had something to do with the switch that the clutch depresses when you push it back.  Under the dash I went and the switch appeared fine, depressed smoothly.  I went by the Toyota dealership and they said they could order me a new switch for $55 plus shipping and handling for a total of sixty something dollars.  I need to change careers and just make little switches for Toyota.  This thing is 1″x.5″x1″ you could fit $1000 worth of them in your pockets.  It was worth a little more exploration before shelling out $60 for a switch.

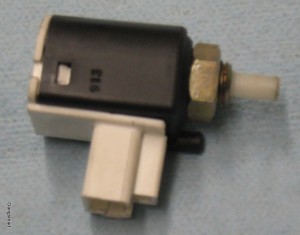
I undid the nut and the connector and took the switch off:

That'll be $60 please

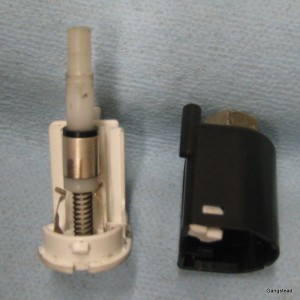
Looked alright, but was getting weird readings with the multimeter when I measured from the switch’s contacts and moved the plunger in and out.  Sometimes it would short, sometimes it wouldn’t.  There were 3 plastic tabs on the white base of it that hold the black cover on, I teased those loose with a screwdriver and found the problem.

Switch with cover removed. This is after I fixed it.
Solution

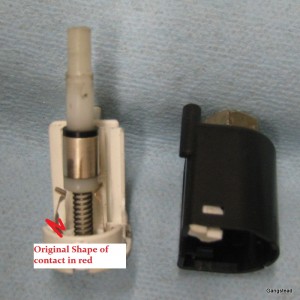
The switch was pretty simple. The metal part of the plunger, when pushed down, makes connection between the two contacts on either side.  When I opened it up the left one was crushed down to the bottom.  Instead of the plunger sliding between the two it had flattened one of them.  I think I did this when I was stretching my foot (I was on a road trip).  It would still occasionally make intermittent contact depending on how the crushed contact lined up.  Since I didn’t take a picture until after I bent it back into a roughly straight line here’s a handy Paint diagram:

How the contact looked when it was crushed and the switch didn't work.

Put the switch back on and the truck starts up great now.  I can’t be too mad at Toyota, I did nudge the switch, but it had enough wiggle room in it for it to come down on top of the contact.  I’m also not that mad when a switch only lasts 12 years.  Still I should get into the $60 switch manufacturing business.

Time:

1 hour total, I mostly in tinkering

Money:

$60 (saved).

Quick Fix: SQL datetime

Setup:

I was importing some records from system A to system B.  Both were using MS SQL 2008 databases.  In my stored procedure there is an insert … select … statement.

Problem:

It turns out that system A stores the date_time field for the record in UTC time and then the application displays it as local time (Central time zone in this case).  System B is less robust and assumes the date_time matches whatever the local server time is.  All users are shown records in server time, wherever the user may be located.  Depending on the setup this usually never happens.  Let’s just say I’m aware of the shortcomings of this method and I’ll leave out the cliche “if I had been in charge I would have …” comment.

This was brought to my attention by a customer who said that their system said the record occurred at August 1st at 1 PM, but the new system said it occurred August 1st at 6 PM.  This wasn’t acceptable because they needed the info to match to be sure they brought up the same record in both systems.

Fixed:

I didn’t want to hard code anything in my stored procedure like “subtract 5 hours” to convert UTC to local time.  This would work for 9 months out of the year, but when daylight savings time ends CST is -6 hours from UTC.  DST changes from year to year, and sometimes the congress changes it all together and I don’t want to build that complexity into a dumb stored procedure.

First, you can get the difference in hours between UTC and local time with this:

select datediff(hour,GETUTCDATE(),GETDATE())

Then you can use dateadd to add that offset when you are inserting from A to B:

insert into A.dbo.records
date_time
select
dateadd(hour,datediff(hour,GETUTCDATE(),GETDATE()),utc_recs.record_date) as date_time
from B.dbo.utc_records utc_recs

This is greatly stripped down of course to show just the salient point.  I hope this saves someone some time in the future.

Steven Gangstead

Note: The only site I had to consult was the msdn library on date and time functions.