@ZaneTheSinger Great thing to commemorate. That picture’s going to come in real handy when he’s older.
Supreme 90 Chest Shoulders Tris
This is the fourth workout review from the Supreme 90 Day program. All S90 work outs use a common warm up and cool down.
Work out: Chest Shoulders Tri
Length: 34:53
Equipment: Dumbbells, Ball
Format:
First set targets core muscles (2 exercises, repeat 2 times). Then
3 super sets (3 exercises, repeat 3 times).
Review:
After the intro core set (which I think all workouts may have) it is 3 super sets. The pace one notch below Frantic. I call it “I think I may miss the train” (you know, where you are too embarrassed to run all out, so you do an awkward shuffle run while you hold your backpack still). The demonstrators aren’t racing and they don’t transition between sets in the superset like triathletes so you can mostly keep up with them. This was a great improvement over previous work outs reviewed so far. I found if I did 8 reps while they were doing 12 I would be done with time to change my adjustable weights for the next exercise.
The sets were pretty good and the use of ball made it more interesting. The shoulders and tris get a little more workout than the chest. At one point the rashness of the production shows itself when all three of the demonstrators finish the second repeat of the super set, put their dumbbells away and look at the host. They all share an awkward moment before he realizes there’s still a repeat left and tries to spin it like it was just them who forgot and not everyone in the studio except the one producer frantically waving his clip board off stage. That guy still has hopes of advancing his career past infomercials.
Score (out of 10): 7
Compared to P90X:
Chest Shoulders Tri on P90X is ten times the workout this is, but sometimes you don’t feel like killing yourself. Also the use of the ball adds some levity and I enjoy it.
I will try to keep the pace of the reviews at about two per week. There are 6 more workouts to review.
-Steven Gangstead
Dishwasher fix
One of the things I got on the blog train for was sharing fixes I make around the house. While there is a website for every subject imaginable I figured I’d just post and let Google sort it out. I figure what I could do is make a post as helpful as possible with a lot of keywords and hopefully it will help out the next person who needs to do the same fix as me and they will just find it by Googling their problem. This is my second DIY post. My first was about the pool
Came home one day this week and the dishwasher was broken. I had started a load of wash before I left and it stopped in the middle of the cycle with partly cleaned dishes and a tub of water standing at the bottom. It was unresponsive and the lights wouldn’t light. Luckily it was a cheap fix. It was sort of quick (a couple of hours) but if you have the same problem and found this post then it will be a thirty minute job total.
Model: Whirlpool Gold – Quiet Wash Plus (front of door)
Model number: GU940SCGB2 (located on a silver badge on the inside of the unit on the right side, you have to open the door to see it)
I assume this dishwasher came new with the house so that would make it about 12 years old. What a piece of junk! Just kidding, 12 years is a good time, but you know what’s better? More years. I’m getting a fence put in and I don’t want to have to buy an appliance on top of that.
The first thing I did: I heard that a common failure point for dishwashers was the latch on the door. It gets a lot of use and there are a couple relays in it so I thought maybe one of those was out and the unit was shut off because it thought the door was open. It wasn’t too hard to do, and I verified the relays with my multimeter. I even undid the screws that secure it to the counter adn rolled it out and looked for … I don’t know what I was looking for. It was plugged in. After a little research online I found out what I SHOULD have done.
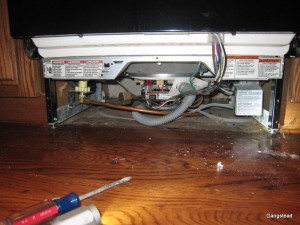
The first thing I should have done: Since it wouldn’t power up then something is wrong with the supply of juice. If it powered up but didn’t turn or pump then I would look at a motor but this was more basic than that. No power. So start from the wall (figuratively, you don’t have to slide it out). The power chord isn’t going to fail, so where does it lead? Disconnect the power! Then remove the toe plate. It’s just two screws on the front of the unit.

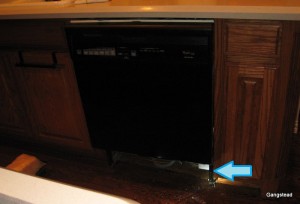
Next go to the silver box (indicated by my awesome MS Paint arrow). This box is where the generic extension chord is hacked off and spliced into the power for the washing machine. On this Whirlpool it’s on the right side of the unit. You did turn the power off, right? Because the next step is to open it up. Don’t know how to turn the power off? Step 1: Call an electrician because you don’t want your first time to be based off of some yahoo’s instructions on the internet. OK. Power’s off. Open it up (one screw). If your machine broke like mine then diagnosis is complete.

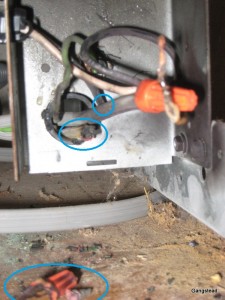
I was unable to take a good photo of the carnage in there, but it was obvious this was the problem because a charred half of a wire nut fell out and the end of the wire was burnt black. I cut off the charred bits of those wires and stripped some back and put a new wire nut on. I also changed out the other wire nut just for good measure.

I don’t know why it failed after a decade of service, but I can speculate. If your dish washer is fixed now and you don’t care why then stop reading. My engineering speculation is if the motor is going out it might be drawing more current when it first turns on. It didn’t look like there was a fuse anywhere so there’s nothing to limit a current spike, so that could cause the wire to warm up. It looks like the solid core wire (the one that goes to the dish washer, the power chord was braided) broke off at the end. If any of those little braids were still making contact they would have fizzled when trying to take the whole load and that’s what burned the wires. I know the dishwasher won’t last forever, but I hope this gets me a couple more years out of the appliance.
Total cost of fix: about $.20 (two wire nut out of a $2 box)
-Steven Gangstead
Flipping sweet deal, last one …
Flipping sweet deal, last one of these I went to was a blast and totally worth the money! #dailydeals http://t.co/MvDbWw5 via @DealsofDallas